

Module · CMMS
Import/Export Diagnostics
Import/Export Diagnostics
Diagnostic management is optimized with advanced bulk import and export of data, including specific part details. These tools simplify the integration, monitoring and analysis of diagnostics in a centralized system.
Bulk import provides a fast and reliable method to integrate multiple diagnostics simultaneously using a preformatted file. By reducing the time spent on manual entry, this feature ensures consistent and accurate data updating, minimizing errors and facilitating daily management.
Exporting diagnostics, along with their part-related details, centralizes all relevant information into usable files, typically in CSV or Excel format. This data provides an overview of maintenance operations, enabling strategic planning, optimal resource allocation and full transparency in monitoring activities.
By combining these two features, businesses benefit from a smooth and structured process to efficiently manage diagnostics, while ensuring full traceability and compliance.
Mass import of diagnostics
Bulk import of diagnostics provides users with an efficient method to add multiple diagnostics simultaneously into the system using a preformatted file. This feature is particularly useful for companies or establishments that manage a large volume of diagnostics and want to integrate them quickly while minimizing errors.
By uploading a file containing all the necessary information about each diagnosis, this option greatly simplifies the adding process. It reduces the time spent on manual entry and ensures fast and accurate data updating. This way, managers can focus on strategic tasks, while maintaining an up-to-date and consistent diagnostic database.
Step 1: Download and prepare the template file
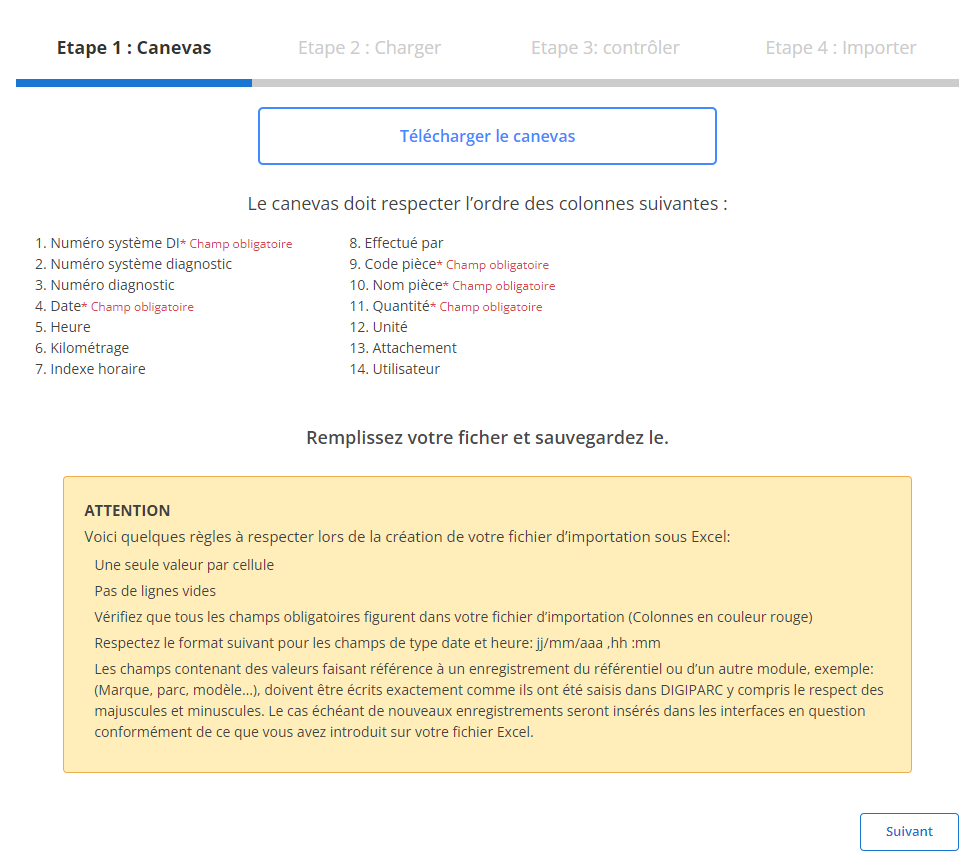
Before you start importing, you need to download a template file specifically designed for this operation. This file contains predefined columns that must be respected to ensure a smooth and error-free import. Here are the steps to follow to prepare this file:
-
Download the template file:
The template file is available through the system interface. It contains all the columns needed for import.
-
Respect the order of the columns:
The fieldsobligatoryfor each line are:
- DI No.
- System No.
- Number
- Date
- Quantity
-
Prepare your file:
- Make sure there is only one value per cell.
- Avoid blank lines in the middle of the file.
- Verify that the dates follow the required format (dd/mm/yyyy).
- Complete all required fields for each row to avoid errors during import.
Step 2: Load the diagnostics file
Once your template file is correctly completed, you can move on to loading the data into the system.
-
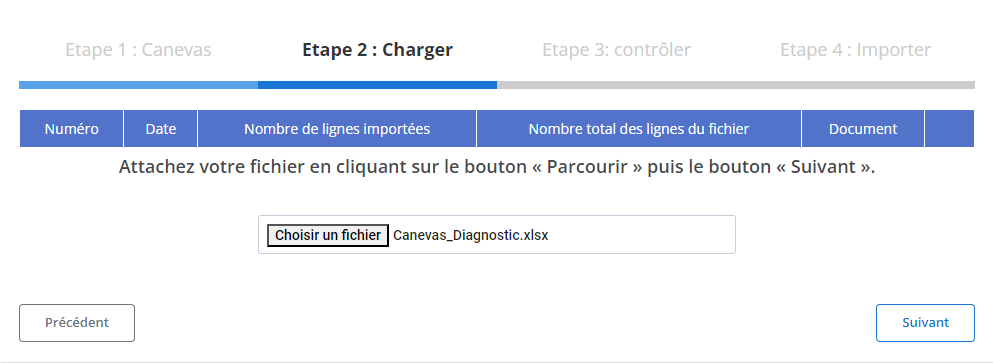
Select file:
Click the button“Browse”to locate the template file on your computer, then select it.
-
Start loading:
Once the file is selected, click“Following”to start the process. The system will analyze the contents of the file to verify its conformity and prepare the data.
-
Data Summary:
- A summary table will display the total number of rows and the rows ready to import.
- This allows you to validate the content before continuing.
Step 3: Verifying the imported data
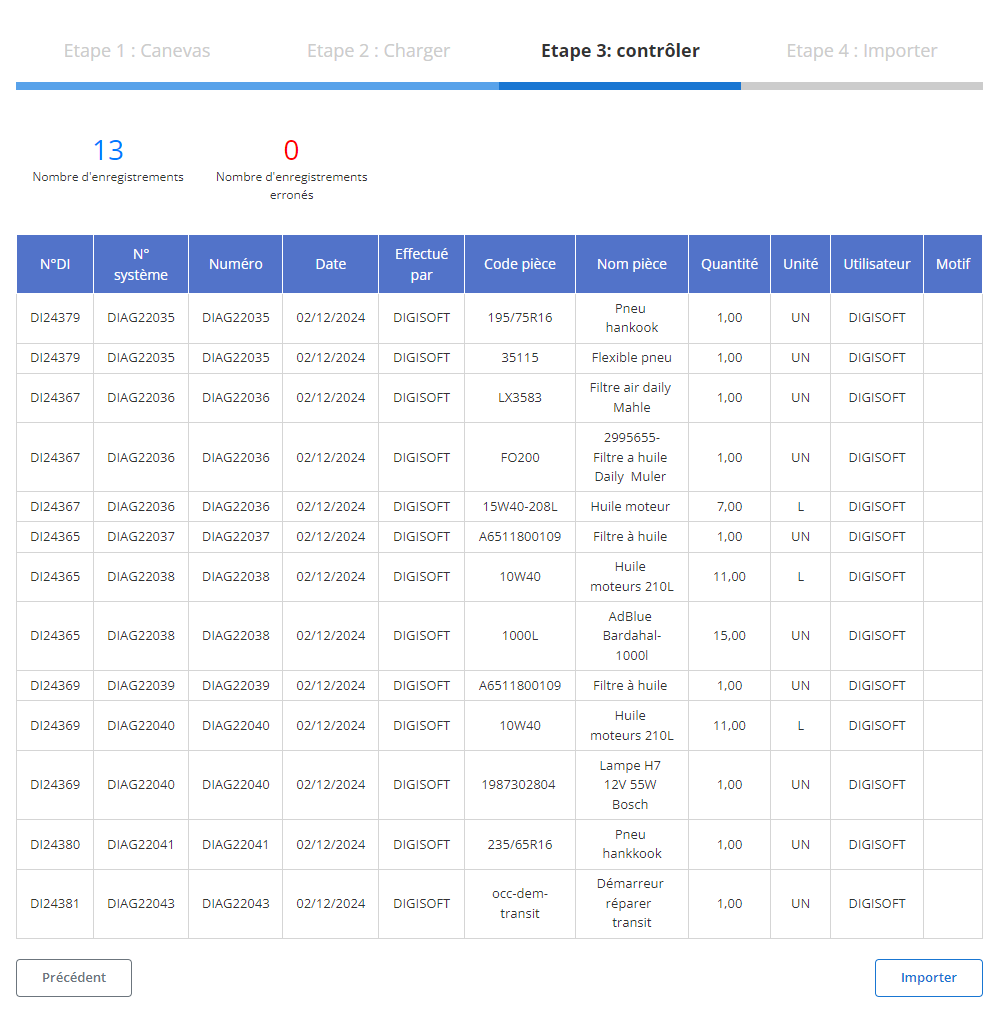
After loading, a summary table will be displayed with all the data from the file. This step is crucial to check and correct any errors.
-
Error checking:
- The system will highlight any errors, such as mandatory fields not filled in (e.g.:DI No., System No., Date, GoldQuantity) or incorrect formats (e.g.: date format).
- You will need to correct these errors before finalizing the import.
-
Validation of correct data:
- Rows without errors will be marked ready for final import.
- You can check key fields such as:
- DI No.
- Date
- Part code
- Part name
- Quantity
- And other relevant information related to the diagnosis.
Step 4: Finalize the diagnostics import
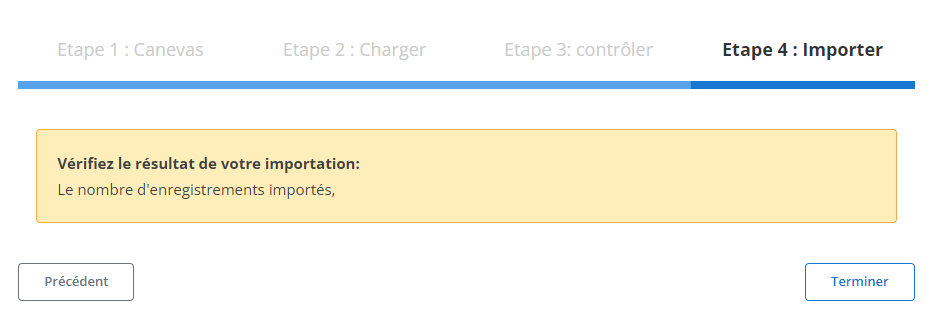
Once the data has been verified and corrected, proceed with the final import.
-
Click “Import”:
This action will validate the addition of diagnostics to the system.
-
Import confirmation:
A confirmation message will be displayed to indicate that the import was successful, and that all data has been integrated correctly.
Data Export: Diagnostics and Diagnostics with Parts Details
Exporting diagnostics-related data, along with their specific part details, is an essential functionality for efficient and documented management of maintenance activities. By centralizing and structuring all relevant information in exportable files, generally in CSV or Excel format, this capability provides a complete view of diagnostic operations and associated interventions. This exported data is particularly useful for optimizing resource management, improving planning and ensuring full transparency in activity monitoring.
Exported Information: Diagnostics
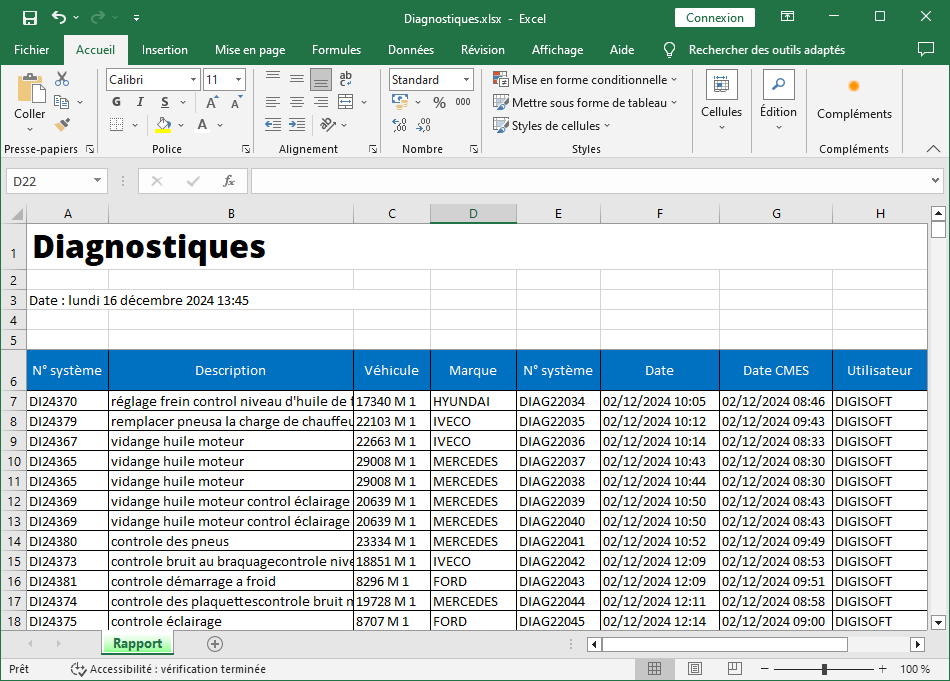
The file dedicated to diagnostics includes the following columns:
- System No.: This unique number identifies each diagnosis, allowing efficient monitoring and complete traceability.
- Description: Provides a detailed summary of the problem identified during diagnosis, providing a quick understanding of the incident.
- vehicle: Mentions the vehicle concerned by the diagnosis, facilitating precise management of the fleet.
- Brand: Specifies the vehicle brand, allowing clear classification for analyzes by manufacturer.
- System number (linked reference): Connects the diagnosis to other elements or systems for interconnected management.
- Number: Indicates an additional identification number, useful for cross-references.
- Date: Indicates the date on which the diagnosis was made, essential for the chronological monitoring of interventions.
- CMES date: Mentions the date of conclusion of the diagnosis or its final state (Closing, Modification, Evaluation, and Monitoring).
- User: Identifies the person who initiated or validated the diagnosis, reinforcing the traceability of actions.
Exported Information: Diagnostics with Parts Details
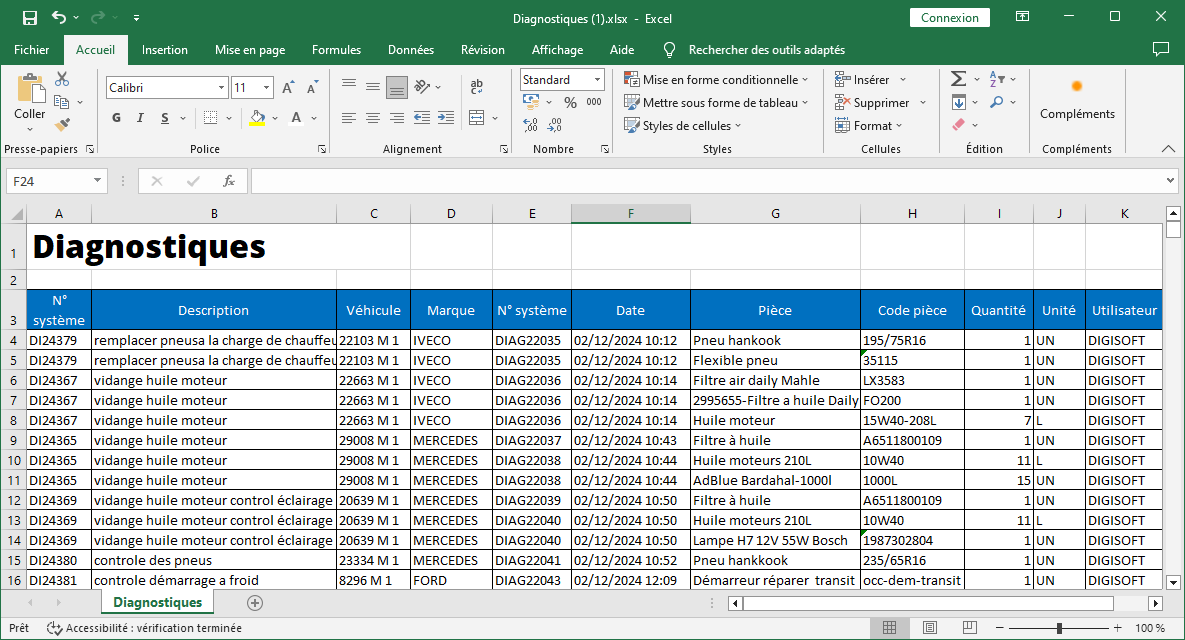
This file expands on the previous information by incorporating specific details of the parts used or identified during diagnostics. Columns include:
- System No.: Identifies the diagnosis to which the parts are associated.
- Description: Provides a description of the intervention or technical observations.
- vehicle: Indicates the vehicle concerned by the intervention.
- Brand: Specifies the vehicle brand.
- System number (linked reference): Additional reference allowing cross-analysis.
- Number: Additional number for a fine classification of diagnoses.
- Date: Date of intervention or observation.
- Piece: Name or description of the part used or identified.
- Part code: Unique code assigned to each part, facilitating stock management and quick searches in databases.
- Quantity: Indicates the number of parts used, providing visibility into resource consumption.
- Unit: Specifies the unit of measurement (e.g. piece, liter, etc.), essential for accurate inventory management.
- User: Mentions the person who recorded the information, guaranteeing the traceability of the data.
By making the structured and detailed extraction of diagnostics and information related to parts possible, this functionality ensures optimal management of interventions and resources. Companies benefit from exhaustive documentation, essential for:
- Optimize costs and inventory availability.
- Rationalize interventions by identifying recurring critical points.
- Improve coordination between maintenance teams and managers.
- Facilitate compliance with standards and preparation for audits.
This functionality, designed to meet operational and strategic needs, guarantees total visibility into the management of diagnostics and their material impacts, while enabling informed and proactive decision-making.