Module · Finance
Invoice Management
Invoice Management
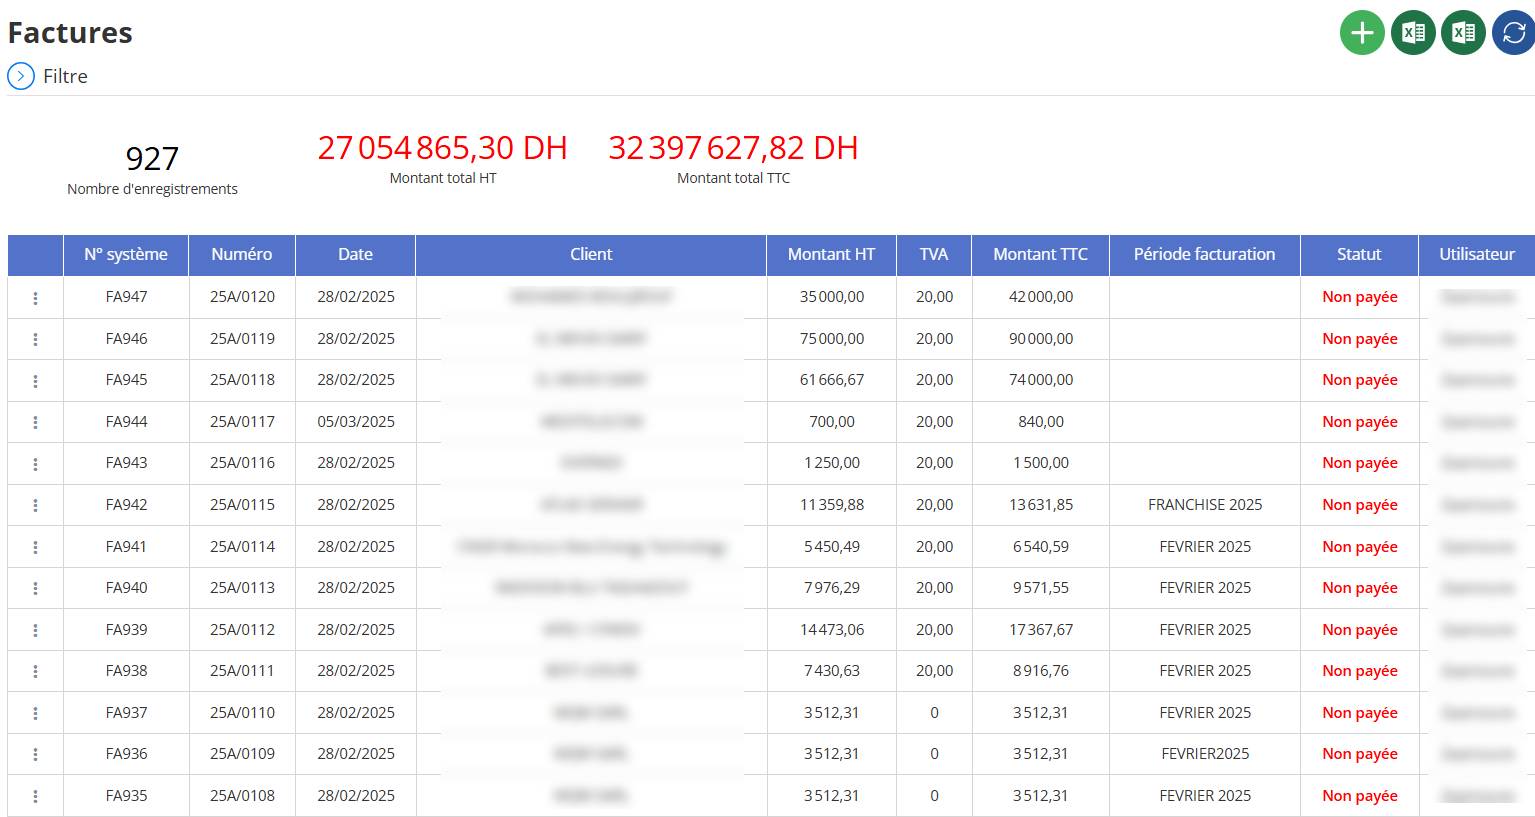
The interface“Bills”is a robust and ergonomic tool integrated into a finance module, designed for the management and monitoring of invoices issued to customers. It provides a detailed overview of financial transactions, allowing users to efficiently view, analyze and manage invoices awaiting payment. This interface is particularly useful for tracking amounts owed, monitoring payment statuses and preparing financial reports, while ensuring complete traceability of transactions.
Adding an Invoice via the Form
Step 1: Access the Add Form
Navigate to the Invoices Interface:The user must be on the main "Invoices" interface, which displays a table of existing invoices.
Click on the “+” Button:At the top right of the main interface, a green button with a "+" icon is available.
- Action :Click this “+” button.

- Result:This opens a form titledGeneral information. This form is designed to enter the details of a new invoice.
Step 2: Complete the Form
The form is divided into two main sections:General information(top) and"Details"(down). Here are the fields to fill out in each section, with a detailed explanation of each column or field.

Section 1: General Information
This section brings together the basic information necessary to identify and characterize the invoice.
Number:
- Role :Text field to enter a unique invoice number, serving as an internal or external reference.
- Explanation:This field allows you to assign an identifier to the invoice, often used in exchanges with the customer or for accounting tracking. It can be generated automatically by the system or entered manually (for example, "25A/0121").
- Action :Enter a unique number or let the system generate it.
Date :
- Role :Indicates the date the invoice was issued.
- Explanation:This field defines the date on which the invoice is officially issued, serving as a starting point for the payment due date and accounting tracking. It is pre-populated with the current date (for example, "03/14/2025"), but a date picker (calendar icon) allows you to change it.
- Action :Check the date or adjust it if necessary by clicking the calendar icon.
Customer:
- Role :Drop-down menu to select the customer receiving the invoice.
- Explanation :This field allows you to link the invoice to a specific customer. It displays "Choose" by default, and a drop-down list offers existing customers. A "+" button on the right allows you to add a new customer if necessary. This field is mandatory (marked with a red star *).
- Action :Click the drop-down menu and select a client, or add a new one via the "+" button.
Amount excluding tax:
- Role :Field to enter the amount excluding taxes (HT) of the invoice.
- Explanation:This field represents the gross cost of the goods or services invoiced, before taxes are applied. It is displayed at "0.00 DH" by default, with the unit "DH" (dirhams) indicated. The amount excluding tax will be calculated automatically based on the lines added in the "Details" section.
- Action :Leave this field as is for now; it will be updated after completing the "Details" section.
VAT:
- Role :Field to enter or display the value added tax (VAT) amount.
- Explanation:This field indicates the applicable tax, calculated on the amount excluding tax (for example, 20%). It is displayed at “0.00 DH” by default and will be updated automatically once the amount excluding tax has been defined.
- Action :Leave this field as is; it will be calculated automatically.
Amount including tax:
- Role :Field to display the total amount including all taxes (TTC).
- Explanation:This field represents the final amount that the customer will have to pay, including the amount excluding VAT and VAT (Amount including VAT = Amount excluding VAT + VAT). It is displayed at "0.00 DH" by default and will be updated automatically.
- Action :Leave this field as is; it will be calculated automatically.
Certificate number:
- Role :Text field to enter a certificate or reference number (optional).
- Explanation:This field allows you to associate a supporting document number, such as a service certificate or a certificate, often required in certain professional contexts.
- Action :Enter a number if applicable, otherwise leave blank.
Delivery date:
- Role :Field to specify the issue or due date of the invoice.
- Explanation:This field indicates a key date for tracking the payment, such as the payment deadline or the delivery date of the goods/services. It is empty by default, with a calendar icon to select a date. This field is mandatory (*).
- Action :Click the calendar icon and choose a date (for example, "04/14/2025").
Billing period:
- Role :Text field to indicate the period covered by the invoice.
- Explanation:This field associates the invoice with a specific period (for example, "MARCH 2025" or "FEBRUARY 2025"), useful for recurring or periodic invoices.
- Action :Enter a time period (for example, "MARCH 2025").
Bank account:
- Role :Drop-down menu to select the bank account associated with the payment.
- Explanation:This field allows you to link the invoice to a bank account where the customer will have to make the payment. It displays “Choose” by default and offers a list of available accounts. This field is mandatory (*).
- Action :Select a bank account from the drop-down list.
Attachment:
- Role :Field to attach a file linked to the invoice.
- Explanation:This field allows you to upload a document (for example, a PDF copy of the invoice, a contract, or a quote) to archive proof or supporting documentation. It shows "No files chosen" by default, with a "Choose file" option.
- Action :Click "Choose File" and select a document to attach, if necessary.
Section 2: Details
This section allows you to detail the products or services invoiced, in the form of a table with several columns.

Designation * :
- Role :Mandatory field to describe the item or service being billed.
- Explanation:This field allows you to specify the nature of the service or product sold (for example, “Consulting service” or “Sale of equipment”). It is mandatory (*).
- Action :Enter a clear description (for example, "Legal consultation").
Quantity:
- Role :Field to indicate the number of units invoiced.
- Explanation:This field allows you to specify the quantity of products or services (for example, 1 for a single service, 5 for several units).
- Action :Enter a quantity (for example, 1).
Vehicle:
- Role :Optional field to associate a vehicle with the invoice.
- Explanation:Ce champ est pertinent dans des contextes spécifiques, comme la facturation de services liés au transport ou à la location de véhicules. Il peut être laissé vide si non applicable.
- Action :Saisissez une référence de véhicule si nécessaire, sinon laissez vide.
PU HT:
- Rôle :Champ pour entrer le prix unitaire hors taxes.
- Explication :Ce champ indique le coût unitaire HT de chaque article ou service (par exemple, 10 000,00 DH pour une prestation).
- Action :Saisissez le prix unitaire (par exemple, 10 000,00 DH).
Amount excluding tax:
- Rôle :Champ pour afficher le montant HT total de la ligne.
- Explication :Ce champ est calculé automatiquement (Quantité × PU HT) et représente le coût HT pour cette ligne spécifique (par exemple, 1 × 10 000,00 = 10 000,00 DH).
- Action :Vérifiez que le montant calculé est correct après avoir rempli les champs précédents.
“+” button (Green):
- Rôle :Ajoute une nouvelle ligne dans le tableau.
- Explication :Ce bouton permet d’ajouter d’autres produits ou services à facturer, si la facture comprend plusieurs éléments.
- Action :Cliquez sur "+" pour ajouter une nouvelle ligne si nécessaire, puis remplissez les champs comme décrit ci-dessus.
Step 3: Finalization (Registration or Cancellation)
After filling in the fields in the "General information" and "Details" sections, the user can finalize the operation.
Cancel :
- Rôle :Bouton pour abandonner la création de la facture.
- Explication :Ce bouton permet de fermer le formulaire sans sauvegarder les données saisies. Il est utile si l’utilisateur a fait une erreur ou ne souhaite pas continuer.
- Action :Cliquez sur "Annuler" pour retourner à l’interface principale sans enregistrer.
Save :
- Rôle :Bouton pour valider et sauvegarder la facture.
- Explication :Ce bouton enregistre la facture dans le système, l’ajoutant au tableau principal des "Factures". Une fois enregistrée, la facture sera visible avec un statut initial (par exemple, "Non payée") et pourra être suivie ou exportée.
- Action :Cliquez sur "Enregistrer" après avoir vérifié que tous les champs obligatoires sont remplis et que les montants sont corrects.
Editing an Invoice
Step 1: Access the Invoice Context Menu
Naviguer vers l’Interface des Factures :L’utilisateur doit se trouver sur l’interface principale des "Factures", qui affiche un tableau listant toutes les factures enregistrées.
Localiser la Facture à Modifier :Parcourez le tableau et identifiez la facture que vous souhaitez modifier. Chaque ligne est identifiée par un N° système(par exemple, "FA947" dans l’exemple).
Open the Context Menu:
- Action :Cliquez sur les trois points verticaux ("…") situés à gauche du N° système de la facture souhaitée (par exemple, "FA947").
- Résultat :Un menu déroulant s’affiche, proposant plusieurs options, dont "Modifier", "Dupliquer", "Supprimer", "Imprimer avec cachet", et "Imprimer sans cachet".

Step 2: Select the “Edit” Option
Action :Cliquez sur l’option "Modifier"dans le menu contextuel.
- Icône :Représentée par une icône de crayon, indiquant une action d’édition.
- Résultat :Cela ouvre le formulaire de modification de la facture, prérempli avec les données existantes de la facture sélectionnée (par exemple, "FA947"). Ce formulaire est similaire au formulaire d’ajout, mais les champs contiennent déjà les informations enregistrées.
Step 3: Edit Invoice Data
Le formulaire de modification est structuré en deux sections principales : "Informations générales"et "Détails".
Deleting an Invoice
Étape 1 : Accéder au Menu Contextuel de la Facture
- Naviguer vers l’Interface des Factures :Rendez-vous sur l’interface principale des "Factures", où un tableau affiche toutes les factures enregistrées.
- Localiser la Facture à Supprimer :Parcourez le tableau pour trouver la facture que vous souhaitez supprimer. Chaque ligne est identifiée par un N° système(par exemple, "FA947").
Ouvrir le Menu Contextuel :
- Action :Cliquez sur les trois points verticaux ("…") situés à gauche du N° système de la facture (par exemple, "FA947").
- Résultat :Un menu déroulant s’affiche avec plusieurs options, dont "Modifier", "Dupliquer", "Supprimer", "Imprimer avec cachet", et "Imprimer sans cachet".

Step 2: Select the “Delete” Option
Action :Cliquez sur l’option "Supprimer"dans le menu contextuel.
- Icône :Représentée par une icône de poubelle, indiquant une action de suppression.
- Résultat :Une fenêtre pop-up de confirmation s’affiche avec le message suivant : "Voulez-vous vraiment supprimer cet élément ?". Cette étape est une mesure de sécurité pour éviter les suppressions accidentelles.
Step 3: Confirm or Cancel Deletion
The pop-up window offers two options:
DELETE :
- Action :Cliquez sur le bouton "Supprimer".
- Résultat :La facture est supprimée du système, et elle disparaît du tableau des factures. Cette action est irréversible, sauf si le système dispose d’une corbeille ou d’un mécanisme de récupération.
Annuler :
- Action :Cliquez sur le bouton "Annuler".
- Résultat :La fenêtre pop-up se ferme, et la facture reste inchangée dans le tableau. Aucune modification n’est appliquée.