Module · Finance
Gestion des Règlements Clients
Gestion des Règlements Clients
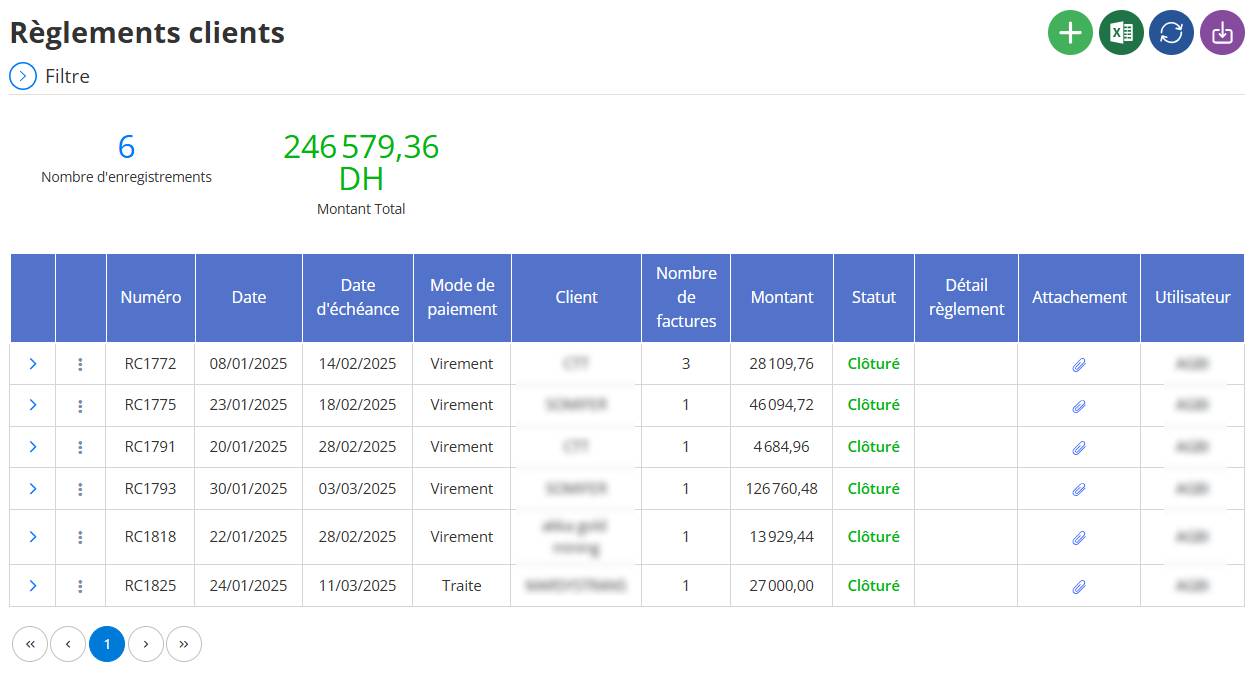
ThereCustomer Payment Managementis a key functionality of the finance module, designed to allow users to track and manage all payments made by customers in relation to invoices issued. This feature provides a centralized, detailed view of payments, making it easier to manage receivables, check balances and close financial transactions.
Adding a Customer Regulation
Step 1: Access the Add Form
Navigate to the Customer Payments Interface:Go to the main interface titled“Customer regulations”, where a table displays the existing regulations.
Click on the “+” Button:
- Action :At the top right of the interface, locate the green button with a "+" icon in the toolbar.

- Result:Cela ouvre un formulaire intitulé“Customer regulations”, with a sectionGeneral information, ready to be filled in to add a new regulation.
Step 2: Enter the Information in the Form
The form is structured to capture the essential details of a customer payment. Here are the fields to fill out in the "General information" section:

Customer:
- Role :Selects the customer who made the payment.
- Action :Click on the drop-down menu showing "Choose" and select the relevant client (for example, "CTT" or "SOMIFER"). If the client is not in the list, use the "+" button to add a new one.
- Noticed :Ce champ est obligatoire pour lier le règlement à un client.
Date :
- Role :Indicates the date the payment was received or recorded.
- Action :Check the pre-populated date (for example, "03/17/2025") or change it by clicking the calendar icon to select another date.
- Noted:This date reflects when the payment was received or recorded.
Payment method:
- Role :Specifies the method used for payment (for example, wire transfer, draft, check).
- Action :Click the drop-down menu showing "Choose" and select the appropriate payment method (for example, "Transfer"). This field is marked with a red star (*), so it is mandatory.
- Noted:Choose the exact mode for precise traceability.
Due date:
- Role :Indicates the payment deadline or due date associated with the payment.
- Action :Click the calendar icon next to the empty field and select a date (for example, "03/20/2025"). This field is marked with a red star (*), so it is mandatory.
- Noted:This date may be relevant for deferred payments or drafts.
Description :
- Role :Provides additional information about the settlement.
- Action :Enter a clear description in the text field (for example, "Payment of invoice 25A/0120" or "Partial payment for February service").
- Noted:This field is optional but useful for internal notes or references.
Step 3: Finalize the Addition
After filling in the necessary fields:
Cancel:
- Action :Click the button“Cancel”(gray) bottom right.
- Result:The form closes without saving the data, and you return to the main interface.
Save:
- Action :Click the button“Save”(blue) bottom right.
- Result:The information entered is validated and saved in the system. The new payment appears in the "Customer Payments" table with an initial status (for example, "Closed" if the amount covers all associated invoices).
Good Practices
- Verification of Mandatory Fields:Make sure the fields marked with a star (*) (Payment method and Due date) are completed to avoid errors during registration.
- Date Accuracy:Verify that the Date and Due Date are consistent with the actual payment.
- Clear description:Add a detailed description to make it easier to follow up in the future.
- Link with Invoices:If possible, associate the payment with specific invoices in a next step (often via a detail interface).
Consultation of the Details of a Customer Payment
Step 1: Access the Customer Payments Interface
Navigate to the Customer Payments Interface:Go to the main interface titled“Customer regulations”, where a table displays all recorded settlements. This table contains columns such as Number, Date, Due Date, Payment Method, Customer, Number of Invoices, Amount, Status, etc.
Locate the Regulations to consult:Browse the table to identify the regulation you wish to view. Each line is identified by aNumber(for example, "RC1772").
Step 2: Click on the Arrow Icon to View
Identify the Arrow Icon:
- Position :To the left of each row of the table, in the first column, an arrow (or chevron) icon is present. This icon is used to expand or collapse the details associated with a payment.
- Example:In the table, the arrow is visible next to "RC1772" and indicates that the details are currently expanded (down arrow).
Click on the Arrow Icon:

- Action :Click the arrow to the left of the regulation you wish to view (for example, next to "RC1772").
- Result:If the arrow is pointing down, it means that the details are already visible. If it is oriented to the right, clicking on it expands a subsection titled“Bills”, displaying the invoices associated with this payment.