Module · Finance
Gestion des paiements fournisseurs
Gestion des paiements fournisseurs
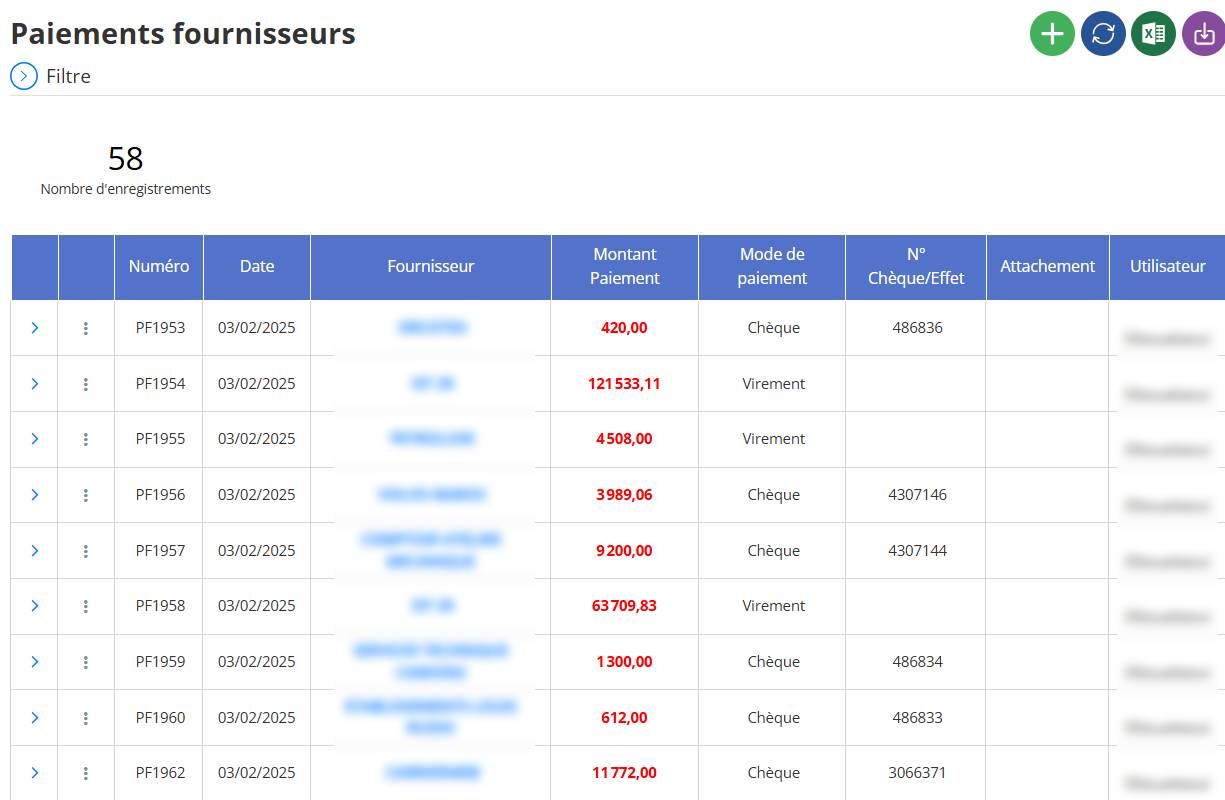
L’interface de Gestion des Paiements Fournisseursest un outil central du module de finance, conçu pour permettre aux utilisateurs d’ajouter et modifier des informations relatives aux paiements effectués aux fournisseurs. Cette interface offre une vue détaillée des transactions, incluant les modes de paiement (chèque, virement), les dates de règlement, et les montants versés, facilitant ainsi la gestion des dettes et le suivi des flux financiers sortants.
Ajout d’un paiement fournisseur
Étape 1 : Accéder au Formulaire d’Ajout
Naviguer vers l’Interface des Paiements Fournisseurs :Rendez-vous sur l’interface principale intitulée"Paiements fournisseurs", où un tableau affiche les paiements existants.
Cliquer sur le Bouton "+" :
- Action :En haut à droite de l’interface, localisez le bouton vert avec une icône "+" dans la barre d’outils.

- Résultat :Cela ouvre un formulaire intitulé"Paiement fournisseur", prêt à être rempli pour ajouter un nouveau paiement.

Étape 2 : Saisir les Informations dans le Formulaire
Le formulaire est structuré pour capturer les détails essentiels d’un paiement fournisseur. Voici les champs à remplir :
Date :
- Rôle :Indique la date de réalisation ou d’enregistrement du paiement.
- Action :Vérifiez la date préremplie (par exemple, "18/03/2025") ou modifiez-la en cliquant sur l’icône de calendrier pour sélectionner une autre date.
- Remarque :Cette date reflète quand le paiement a été effectué ou enregistré.
Fournisseur :
- Rôle :Sélectionne le fournisseur destinataire du paiement.
- Action :Cliquez sur le menu déroulant affichant "Choisir" et sélectionnez le fournisseur concerné (par exemple, "Fournisseur 1"). Si le fournisseur n’est pas dans la liste, utilisez une option pour en ajouter un nouveau (souvent un "+" à côté du menu). Ce champ est marqué d’une étoile rouge (*), donc il est obligatoire.
- Remarque :Ce champ est essentiel pour lier le paiement au bon fournisseur.
Désignation :
- Rôle :Fournit une description ou un motif du paiement.
- Action :Saisissez une description claire dans le champ texte (par exemple, "Paiement facture n° XYZ" ou "Règlement pour achat de matériel").
- Remarque :Ce champ est facultatif mais utile pour des notes internes ou des références.
Mode de paiement :
- Rôle :Spécifie la méthode utilisée pour le paiement (par exemple, chèque, virement).
- Action :Cliquez sur le menu déroulant affichant "Choisir" et sélectionnez le mode de paiement approprié (par exemple, "Virement"). Ce champ est marqué d’une étoile rouge (*), donc il est obligatoire.
- Remarque :Choisissez le mode exact pour une traçabilité précise.
Montant :
- Rôle :Indique le montant total du paiement.
- Action :Saisissez le montant dans le champ numérique (par exemple, "5000,00"). L’unité "DH" (dirhams) est indiquée à côté pour référence.
- Remarque :Assurez-vous que le montant correspond à la transaction réelle.
Attachment (Pièce jointe) :
- Rôle :Permet de joindre un fichier comme preuve du paiement (par exemple, une copie de chèque ou un reçu).
- Action :Cliquez sur "Choisir un fichier" pour sélectionner un fichier depuis votre ordinateur, ou laissez vide si aucune pièce jointe n’est nécessaire.
- Remarque :Ce champ est facultatif mais recommandé pour une traçabilité accrue.
Étape 3 : Finaliser l’Ajout
Après avoir rempli les champs nécessaires, trois options sont disponibles en bas du formulaire :
Annuler :
- Action :Cliquez sur le bouton"Annuler"(gris).

- Résultat :Le formulaire se ferme sans enregistrer les données, et vous revenez à l’interface principale.
Enregistrer :
- Action :Cliquez sur le bouton"Enregistrer"(bleu).

- Résultat :Les informations saisies sont validées et enregistrées dans le système. Le nouveau paiement apparaît dans le tableau des "Paiements fournisseurs" (par exemple, avec un numéro comme "PF1963").
Enregistrer & Ajouter :
- Action :Cliquez sur le bouton"Enregistrer & Ajouter"(bleu).

- Résultat :Le paiement est enregistré, et un nouveau formulaire vierge s’ouvre immédiatement pour ajouter un autre paiement, ce qui est utile pour un ajout en série.